- Gebundenes Buch
- Merkliste
- Auf die Merkliste
- Bewerten Bewerten
- Teilen
- Produkt teilen
- Produkterinnerung
- Produkterinnerung
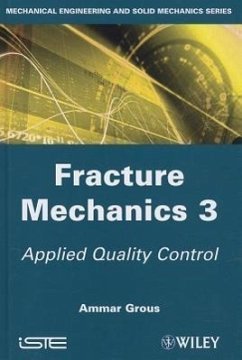
This third book of a 3-volume set on Fracture Mechanics adds a pragmatic and supportive character to the previous volumes by focusing on case studies using corrected exercises that teachers, students or engineers will find extremely useful. Due to the wide themes approached in this series, it can also be used to organize work in this field in a new way, as well as in the maintenance of industrial plants. Several cases of sampling plans and their applications in industry are presented, as well as several solved case studies on the main indicators of capability according to ISO/TS 16949, ISO…mehr
Andere Kunden interessierten sich auch für
![Fracture Mechanics 1 Fracture Mechanics 1]() Ammar GrousFracture Mechanics 1170,99 €
Ammar GrousFracture Mechanics 1170,99 €![Fracture Mechanics 2 Fracture Mechanics 2]() Ammar GrousFracture Mechanics 2172,99 €
Ammar GrousFracture Mechanics 2172,99 €![Rubber as a Construction Material for Corrosion Protection Rubber as a Construction Material for Corrosion Protection]() V C ChandrasekaranRubber as a Construction Material for Corrosion Protection185,99 €
V C ChandrasekaranRubber as a Construction Material for Corrosion Protection185,99 €![Uhlig's Corrosion Handbook Uhlig's Corrosion Handbook]() Uhlig's Corrosion Handbook230,99 €
Uhlig's Corrosion Handbook230,99 €![Computational Mechanics of Composite Materials Computational Mechanics of Composite Materials]() Marcin Marek KaminskiComputational Mechanics of Composite Materials170,99 €
Marcin Marek KaminskiComputational Mechanics of Composite Materials170,99 €![Mechanics and Uncertainty Mechanics and Uncertainty]() Maurice LemaireMechanics and Uncertainty166,99 €
Maurice LemaireMechanics and Uncertainty166,99 €![Engineering Mechanics Engineering Mechanics]() William F RileyEngineering Mechanics302,99 €
William F RileyEngineering Mechanics302,99 €-
-
-
This third book of a 3-volume set on Fracture Mechanics adds a pragmatic and supportive character to the previous volumes by focusing on case studies using corrected exercises that teachers, students or engineers will find extremely useful. Due to the wide themes approached in this series, it can also be used to organize work in this field in a new way, as well as in the maintenance of industrial plants. Several cases of sampling plans and their applications in industry are presented, as well as several solved case studies on the main indicators of capability according to ISO/TS 16949, ISO 8258 and FORD. This book distinguishes itself from other works in the field through its originality in presenting an educational approach which aims at helping practitioners both in academia and industry. It is intended for technicians, engineers, designers, students, and teachers working in the fields of engineering and vocational education. The main objective of the author is to provide an assessment of indicators of quality and reliability to aid in decision-making. To this end, an intuitive and practical approach, based on mathematical rigor, is recommended.
Hinweis: Dieser Artikel kann nur an eine deutsche Lieferadresse ausgeliefert werden.
Hinweis: Dieser Artikel kann nur an eine deutsche Lieferadresse ausgeliefert werden.
Produktdetails
- Produktdetails
- Verlag: Wiley
- Seitenzahl: 288
- Erscheinungstermin: 26. Dezember 2012
- Englisch
- Abmessung: 234mm x 155mm x 23mm
- Gewicht: 431g
- ISBN-13: 9781848214422
- ISBN-10: 1848214421
- Artikelnr.: 36726395
- Herstellerkennzeichnung
- Libri GmbH
- Europaallee 1
- 36244 Bad Hersfeld
- gpsr@libri.de
- Verlag: Wiley
- Seitenzahl: 288
- Erscheinungstermin: 26. Dezember 2012
- Englisch
- Abmessung: 234mm x 155mm x 23mm
- Gewicht: 431g
- ISBN-13: 9781848214422
- ISBN-10: 1848214421
- Artikelnr.: 36726395
- Herstellerkennzeichnung
- Libri GmbH
- Europaallee 1
- 36244 Bad Hersfeld
- gpsr@libri.de
Ammar Grous is Teacher of Mechanical Engineering at CéGEP de l'Outaouais (Academic College), Gatineau, Quebec, Canada.
Preface ix Glossary xvii Chapter 1. Quality Control 1 1.1. Introduction to statistical process control 1 1.2. Classical tolerancing and quality control 4 1.2.1. ISO norms in quality control 5 1.2.2. QS9000 approach 6 1.2.3. Capabilities of CNOMO E41.36.110.N control means 8 1.2.4. Some capability indicators according to ISO/TS 16949, ISO 8258 and FORD 10 1.2.5. Metrological audits 11 1.3. The Pareto law - ABC method 14 1.3.1. Practical application 17 1.3.2. Malfunction spread over 16 so-called "nevralgic" points 18 1.4. Lot inspection by attributes 18 1.4.1. Areas on which lot inspection operates 18 1.4.2. (np) chart for controlling the number of defects 20 1.4.3. (c) card to control the number of defects 20 1.4.4. Average lot quality after control 23 1.4.5. Choosing a sample plan 32 1.4.6. Wald plan case study 34 1.4.7. Average long-term controlled quantity 37 1.4.8. Case study of a simple sampling plan 42 1.4.9. Poisson distribution of cumulative probabilities 43 1.5. Theoretical basics of control by measurement 46 1.5.1. Choosing a simple sampling plan 47 1.5.2. Choosing a simple or double sampling plan 48 1.6. Analysis of process capability 49 1.6.1. Capability indices for a normally distributed variable: X (
,
) 51 1.6.2. Machine capability Cm and Cmk 55 1.7. Capability for a non-normal distribution 56 1.8. Control by measurement charts 57 1.8.1. Size of the samples to be taken and the frequency of control 60 1.8.2. Factor for control of X (mean) and range (R) 63 1.9. Production and reception control 64 1.9.1. Machine adaptation with respect to production tolerances 64 1.9.2. Proportion of faulty units 65 1.10. Control charts 68 1.10.1. Control by measurements charts for the mean and the range R 69 1.10.2. Calculating control limits and case study 70 1.10.3. Study of /R control charts - quality control lab 72 1.10.4. Graphical representation of the rejections due to non-conformity to TI 78 1.10.5. Performance case study: Capabilities 80 1.10.6. Calculating machine capability indices: Cm and Cmk 84 1.11. Conclusion 85 1.12. Bibliography 85 Chapter 2. Quality Control Case Studies 87 2.1. The tools of quality, as per W. Deming 87 2.2. Failure modes, effects and criticality analysis 88 2.3. Total productive maintenance method 88 2.4. The LMMEM "5M" process method 93 2.5. Estimations of times in mechanical productions (machining) 94 2.5.1. Optimizing times and costs in mechanical production 98 2.6. Stock management and supply methods 111 2.6.1. Hypothesis of a general method to improve stock management 113 2.7. Short summary of control charts 116 2.7.1. The various control charts 117 2.7.2. Measurement control charts - stability control charts (Shewhart) 118 2.7.3. Estimating
0 and
0 119 2.7.4. Efficiency - chart of the average 120 2.7.5. Control chart by attributes - determining the limits 121 2.8. CUSUM charts 123 2.8.1. EWM charts 124 2.8.2. Shewhart charts for the average, the range R and the standard deviation (s) 126 2.8.3. Control charts for the average and the range R 127 2.9. Individual control charts 130 2.9.1. Average lengths or CUSUM-Run 132 2.10. EWMA statistics - comparison between Shewhart graph control and the EWMA chart control techniques 133 2.10.1. Poisson normal distribution approximation 138 2.10.2. Decision limits of the X / R control chart through the SPC method 141 2.11. Main statistical tests used in quality control 144 2.11.1. So-called "Henry Line" or probability diagram test 144 2.12. Partial conclusion 149 2.13. Bibliography 149 Chapter 3. Case Studies 153 3.1. Quality control case study: calculating and plotting efficiency curves in simple/double control 153 3.1.1. Simple binomial distribution 153 3.1.2. Calculation results 154 3.2. Calculating the efficiency curves of simple/double control 156 3.2.1. Calculation results 157 3.3. Calculating efficiency curves in double control: binomial distribution, double efficiency plan (Excel version) 159 3.3.1. Calculation results 159 3.4. Progressive control (Excel) 160 3.4.1. Calculating the acceptance and refusal curves in progressive control 160 3.4.2. Calculation results 161 3.4.3. Graph 162 3.4.4. Measurement acceptance test when sigma (
*) is known 163 3.4.5. Determining the efficiency curve and the acceptance limits 163 3.4.6. Acceptance: known standard deviation, sigma = 0.01 164 3.4.7. Measurement acceptance test when sigma* (SD) is known 165 3.4.8. Choosing a plan 166 3.4.9. Plot (Excel) 167 3.5. R&R study in quality control and dimensional metrology 168 3.5.1. R&R (EV Repeatability and AR reproducibility) 168 3.5.2. R&R study 169 3.6. X/S control chart study (average and standard deviation,
) 173 3.7. Case study: capability of a specific control method 178 3.7.1. Measurements from a digital micrometer 178 3.7.2. Definition drawing or clear picture 178 3.7.3. Table of the measurements taken using a digital micrometer (directly read the value from Caliper) 179 3.7.4. Table of calculation results (Excel and MathCAD) 180 3.8. Case study on type A and B uncertainties 181 3.8.1. Uncertainties guide to the expression of uncertainties in measurements (GUM) 181 3.8.2. Estimating the compound uncertainty UC 184 3.9. Case study: uncertainties 184 3.9.1. Uncertainty study as per GUM 185 3.9.2. Graph 200 3.10. Conclusion 200 3.11. Bibliography 201 Appendix 203 Index 257

